

iForm |
Versatile form server and processor.


Tour Topics
Overview (top)
iForm processes HTML form submissions. You can use iForm as an alternative to other scripting methods. Since iForm contains an integrated web server it does not require a separate web server to serve its forms.
Note: In order to understand how iForm works select 'iForm Help' from the Help menu and check out the JumpStart tutorial projects.
- See the 'Forms' section of iForm Help for more information on for input items, and be sure to check out the first JumpStart tutorial project:
Project 0 : Standard Template Input Items
This tour discusses an iForm application which builds an email list in Apple's Contacts (formerly "Address Book") when a user submits a form requesting their name and email. The serving of the form, as well as its processing, is handled completely by iForm.
Although a knowledge of AppleScript is not required to use iForm, a basic understanding of it is very useful because it enables you to pass data into other scriptable apps on your Mac, like Mail or Contacts. The sample example below illustrates this using Apple's Contacts program.
AppleScript is a widely adopted standard scripting language on the Macintosh that enables programs to communicate with each other. A very good reference on AppleScript is : AppleScript: The Language of Automation.
JumpStart Overview (top)
In addition to the online reference manual (accessible from the Help menu), and this Tour, the JumpStart is a series of projects that you can use for additional hands-on experience using iForm. They range from simple (Project 0) to advanced (Project 4), and illustrate many additional uses of templates and AppleScript.
The first time you run iForm you will be asked if you want to install the JumpStart. If you choose not to install you can use the "Install JumpStart" command in the Help menu to do so at a later time. The location of installation is always the "Document Root" folder, the folder iForm serves from. The Document Root defaults to a folder named "iForm" inside the
Home > Library > Application Support > Limit Point Software > iForm > Forms
folder of your Home folder. You can change it using Preferences.
Installation (top)
After the iForm software archive is downloaded and mounted drag the iForm application to your preferred folder, such as the Applications folder. Then launch the application by double clicking on its icon in the Finder. You should run iForm on a computer with a static IP address, and preferably a registered domain name, so that users can connect.
If you register iForm you will obtain a permanent password which entitles you to all future updates of the product. To register you just need to purchase iForm and wait for the registration confirmation to be delivered by email. Enter your password by selecting "Password..." from the iForm menu.
Installing the Tour Sample:
Once iForm is up and running you should install the "Tour Sample," which will place a copy of the files used by this tour into your Document Root folder so that you can run it. To do this simply select "Install Tour Sample" in the Help menu.
Preferences (top)
iForm should be configured the first time it is run, and certainly before you try any sample projects, including this tour's sample. iForm is configured using the Preferences window. Select "Preferences..." from the iForm menu. Here is an overview of the various settings:
Mail server (top preferences)

Enter the address and port of your SMTP mail server. If your server requires authentication enter your username and password also. iForm uses your Keychain to save your password for security, so you may be prompted for authentication.
Mail server setup is a common cause of trouble, here are some tips:
- • Don't use SSL (secure connections) if your mail server does not support it, it may inhibit the program from connecting. Note that the secure connections option is on by default.
- • When testing, if you find you are not receiving the test email, be sure to check your "junk mail folder," especially if you are testing with an HTML message. Your mail message may have been filtered as spam by your email client.
- • You may be required to set the sender, when sending any mail, to the name and email address associated with the mail server's account. This applies to iCloud accounts. With iForm this can be acheived by setting the "iForm_replyTo" input item of the form you are serving. (See Special Template Tags below).
Also see the 'Forms' section of iForm Help for more information on for input items, and be sure to check out the first JumpStart tutorial project:
Project 0 : Standard Template Input Items
-
- • Check that the mail server name, the user name or password are not mispelled. For example, one user typed "stmp.me.com" as the mail server, but it is "smtp.me.com" for iCloud.
- • Check that you are not exceeding your email send limit imposed by the mail server. For more information about this topic see the Decide article on the Mailings website.
- • iForm reports error messages received by the mail server in the Monitor window.
Headers (top preferences)
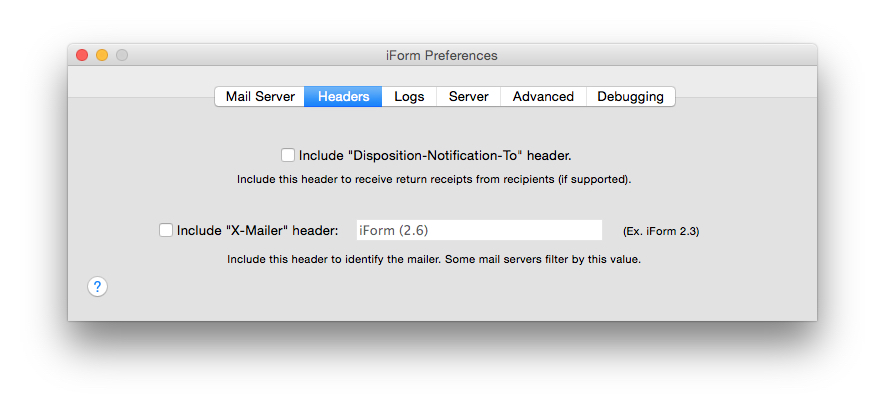
iForm can optionally include two special headers in all email messages it creates.
(1) The "Disposition-Notification-To" header is a request for a return receipt. This enables you to verify the message was received. Not all mail servers (or mail clients) support this feature, and some are known to reject emails which contain this header.
(2) The "X-Mailer" header is used to identify iForm by name to the mail server and recipients. The default name is "iForm" with the current program version appended. You can specify the name of another mail program to spoof the recipients into thinking another program sent the email. This is sometimes useful if a mail server only accepts mail from a restricted set of mailers.
Logs (top preferences)
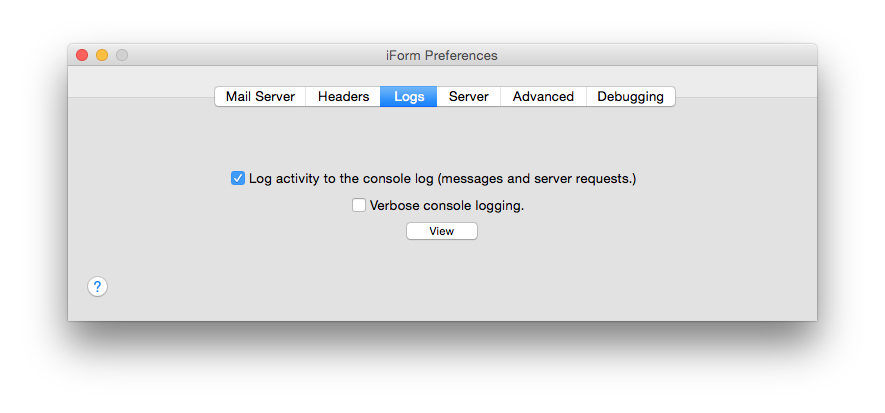
You can have iForm write a log of its activity to a console log file. Console logs are stored in
Home > Library > Application Support > Limit Point Software > iForm
Logs may be viewed with the Console application. Click the View button to open the console log (if it exists.) You can also open the console log using the "Console log..." menu item in the File menu.
iForm will log messages and server requests. If you select verbose console logging iForm will additionally log all commands to the mail server and the server responses. This option is usually useful for identifying problems with communication between iForm and the mail server, so it is not usually selected.
Server (top preferences)
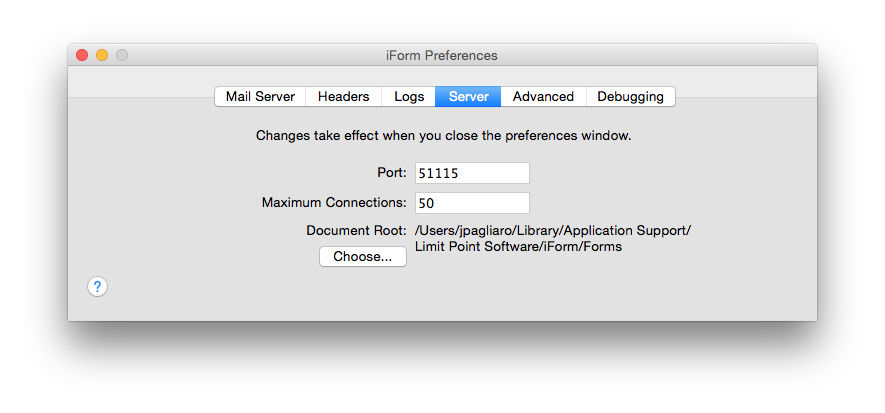
iForm has an integrated web server which can be used to serve your forms and response pages. Specify the port on which you want web browsers to connect to iForm. If you run iForm on the same machine as your primary web server be sure to not select the same port number.
iForm looks for the files it obtains requests for in the "Document Root" folder. This folder is the root relative to which file pathnames will be constructed when processing requests. The folder defaults to a folder:
Home > Library > Application Support > Limit Point Software > iForm > Forms
folder located in your home directory. You can select another folder if you wish.
Advanced (top preferences)
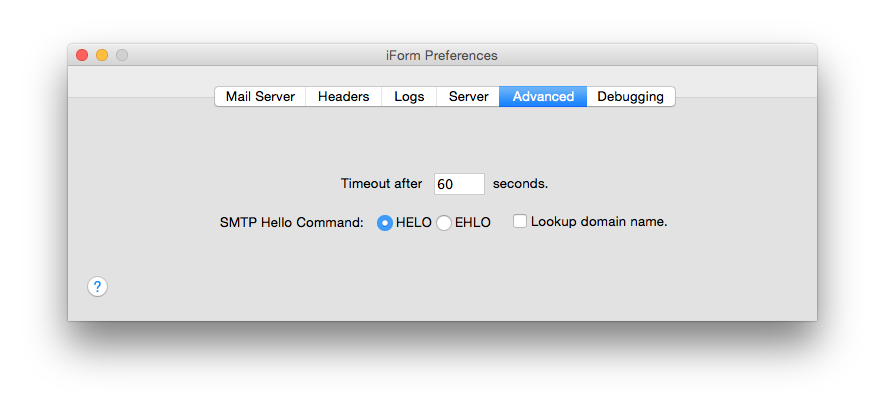
Here you can specify the timeout for network operations and the command iForm will use when saying hello to the mail server. The default values usually work well in almost all cases.
Debugging (top preferences)

When an AppleScript error occurs you can see the script after iForm has expanded any "template tags" it may contain. (Template tags are discussed more later on.) Turn this option on to have iForm prompt you for the location to put the script file.
Another option is to turn off Base 64 encoding facilitating viewing the raw source of email messages generated by iForm.
Sample with Contacts (top)
- Templates and Template Tags
- Special Template Tags
- The Sample Files
- Running the Sample
- Extending The Sample
- Further Extensions
This tour's primary objective is to present an application of iForm that builds an email distribution list of cards in Apple's Contacts. Each card's data is obtained by soliciting a person's name and email address on a form. The form will be served by iForm, and the form submission will be processed by iForm. This form processing will involve saving the submitted data into a card of a particular Contacts group using an AppleScript.
Before explaining the sample files a discussion of iForm's basic operation is in order. It is important that you understand what templates and "template tags" are, and also understand the importance of "special template tags" which are used to invoke specific actions by iForm.
Templates and Template Tags (top sample)
A template is a text file (plain, HTML or AppleScript) which contains "template tags."
Template tags are one of two things:
(1) A form input item name enclosed in curly brackets, as in {lastName}, {firstName} and {emailAddress} or prefixed by a double underscore as in __lastName, __firstName and __emailAddress. (This latter case is used only for AppleScript templates.)
-
Tags of this type are used to insert that value of the submitted form item by the same name into the template.
-
(2) A pathname to an AppleScript file enclosed in curly brackets as in {TourSample:SampleABScript.applescript}, the pathname specified relative to the Document Root folder.
Tags of this type are used to insert the result of the execution of the AppleScript into the template. (The result of an AppleScript is usually the value of the last line in the script.)
Caveat: As hinted above, AppleScripts themselves can also be templates in that they may include template tags of type (1). This is how submitted form values are passed into the script before it is executed. However, in this case remember that the tag is not enclosed in curly brackets, but rather prefixed with a double underscore, as in __lastName, __firstName and __emailAddress. The reason for this is that AppleScript uses the curly bracket to delimit lists.
Special Template Tags (top sample)
iForm reserves the name of certain form input items (and their corresponding template tags) to implement special functionality. Such input items are usually included on the form as "hidden" elements which the user can't see (unless they view the HTML source of the form in their web browser.)
The complete list of such template tags is discussed in the online reference manual accessible from the Help menu. The five we use in this sample are discussed here, each included as a hidden input item on our form:
-
iForm_mailTo (top special_tags)
Specifies the recipients of the mail message iForm will generate when the form is submitted. You can separate multiple values with commas (no spaces in between.)
-
In this example you must use this element to specify your email address. You must open the form in a text editor and change the email address to your own. (Otherwise I will get your email.)
<INPUT TYPE="hidden" NAME="iForm_mailTo"
		VALUE="joe@limitpointstore.com">
-
iForm_replyTo (top special_tags)
Specifies the reply-to address of the message. You can simply use your own address.
-
<INPUT TYPE="hidden" NAME="iForm_replyTo"
		VALUE="joe@limitpointstore.com">
-
iForm_subject (top special_tags)
Used to specify the subject of the mail message.
-
<INPUT TYPE="hidden" NAME="iForm_subject"
		VALUE="iForm Sample">
-
iForm_mailTemplatePathname (top special_tags)
Used to specify the pathname of the mail message template file relative to the Document Root. (For historic reasons the path's folders are separated by colons as opposed to forward slash. A future version will fix this.)
<INPUT TYPE="hidden" NAME="iForm_mailTemplatePathname"
		VALUE="TourSample:EmailNotice.html">
-
iForm_responseTemplatePathname (top special_tags)
Used to specify the pathname of the response template file relative to the Document Root. (For historic reasons the path's folders are separated by colons as opposed to forward slash. A future version will fix this.)
<INPUT TYPE="hidden" NAME="iForm_responseTemplatePathname"
		VALUE="TourSample:ThankYou.html">
The Sample Files (top sample)
All the files used by this example are part of the software distribution. Refer to the Installation section above for instructions on how to install them. Here is a list of the four files used, along with a brief description of each:
-
TourSampleForm.html (top sample_files)
This is the HTML form a person will load into their web browser to enter their name and email address for inclusion on the mailing list. When they click this form's submit button the information they enter will be sent to iForm. iForm will then use the submitted data to create a new person card in Contacts.
-
This form contains just three text fields. One is for the users first name, and it is labeled "firstName." Similarly there is a form input item named "lastName" and "emailAddress" for the person to enter their last name and email address, resp.
The values of the text fields will be passed to iForm when the form is submitted, and iForm will then associate the values with the names of the input items. This way the values can be referenced by templates and AppleScripts using template tags.
-
This form also contains hidden fields, as discussed above in "Special Template Tags." These hidden elements are used by iForm to send the email message and process the response.
-
ThankYou.html (top sample_files)
This is an HTML template iForm will use to build a client response when the TourSampleForm form is submitted. It acts as confirmation to the client, and also specifies how they can be removed from the mailing list they just joined.
-
-
EmailNotice.html (top sample_files)
This is the HTML template iForm will use to build an email message which will be sent to you in order to notify you that someone submitted the TourSampleForm form.
-
As discussed in more detail below this page is a template so that iForm can display the name and email address of the person who submitted the form.
This template also includes a very special template tag, namely the one which references the AppleScript which we want to execute to create the new Contacts card:
{TourSample:SampleABScript.applescript} -
SampleABScript.applescript (top sample_files)
This is an Applescript which iForm will run to make a new person in Contacts. The person will be added to a group named "Form Submissions" provided a person by the same name does not already exist. The group will be created by the script if it does not already exist.
-
The script is executed when iForm processes the EmailNotice template described above because that template has a template tag which references this file.
The script is fairly straightforward, and like most AppleScripts (almost) reads like a human language paragraph telling Contacts what to do. The key element here is to notice how data is passed into the script using the tags "__firstName", "__lastName" and "__emailAddress." As described more below each such tag corresponds to the TourSampleForm form text field input items named "firstName", "lastName" and "emailAddress," resp.
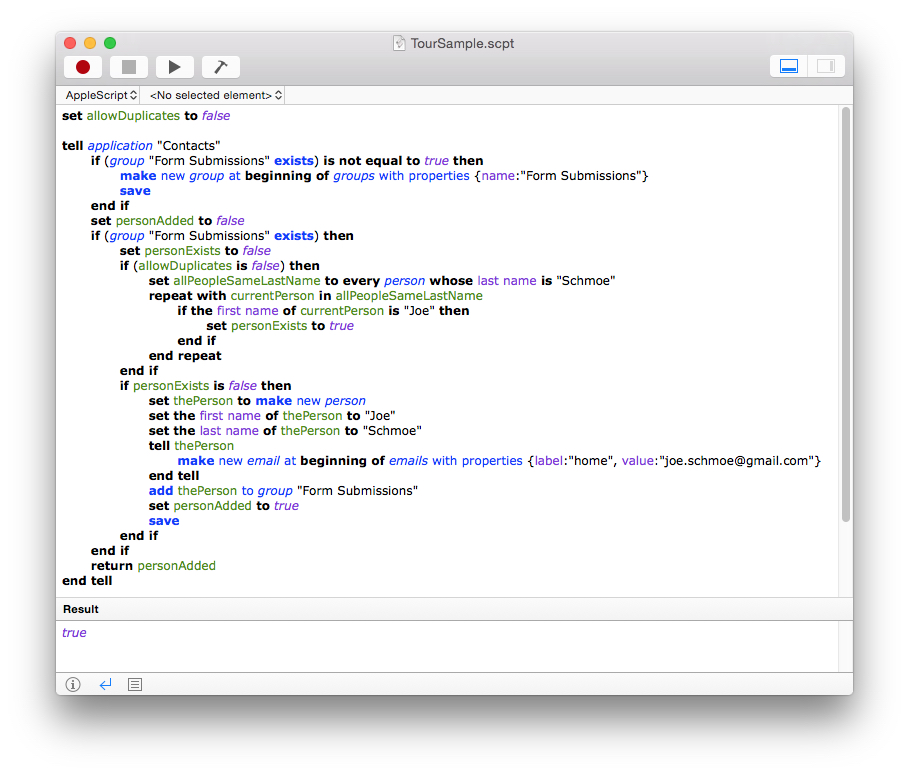
set __groupName to "Form Submissions" set __emailLabel to "home" -- "work" set allowDuplicates to false tell application "Contacts" if (group __groupName exists) is not equal to true then make new group at beginning of groups with properties {name:__groupName} save addressbook end if set personAdded to false if (group __groupName exists) then set personExists to false if (allowDuplicates is false) then set allPeopleSameLastName to every person whose last name is __lastName repeat with currentPerson in allPeopleSameLastName if the first name of currentPerson is __firstName then set personExists to true end if end repeat end if if personExists is false then set thePerson to make new person set the first name of thePerson to __firstName set the last name of thePerson to __lastName tell thePerson make new email at beginning of emails with properties {label:__emailLabel, value:__emailAddress} end tell add thePerson to group __groupName set personAdded to true save addressbook end if end if return personAdded end tell - The last line of the script "return personAdded" will be the value of the script. The script tag will therefore be replaced with either the value "true" or "false."
If you copy and paste the following into Script Editor right now and run it, you will can the script in action. It is the same as the script above, but the template tags have been replaced by actual values and the formatting has been removed so that Script Editor does not have a problem with it:
-
set allowDuplicates to false
tell application "Contacts"
if (group "Form Submissions" exists) is not equal to true then
make new group at beginning of groups with properties {name:"Form Submissions"}
save
end if
set personAdded to false
if (group "Form Submissions" exists) then
set personExists to false
if (allowDuplicates is false) then
set allPeopleSameLastName to every person whose last name is "Schmoe"
repeat with currentPerson in allPeopleSameLastName
if the first name of currentPerson is "Joe" then
set personExists to true
end if
end repeat
end if
if personExists is false then
set thePerson to make new person
set the first name of thePerson to "Joe"
set the last name of thePerson to "Schmoe"
tell thePerson
make new email at beginning of emails with properties {label:"home", value:"joe.schmoe@gmail.com"}
end tell
add thePerson to group "Form Submissions"
set personAdded to true
save
end if
end if
return personAdded
end tell
In Script Editor this script, when run, should look like this:
-
Caveat: Make sure that when you save your own AppleScripts you save them as text files, and not as a scripts. The extension should be "applescript" and not "scpt" otherwise iForm will not be able to load and process the script.
Running the Sample (top sample)
Follow these steps to run the Tour Sample:
(1) First, make sure the folder "TourSample" is located in iForm's Document Root. You can use the "Document Root" button in the monitor window, or the "Go To Document Root..." menu item under the File menu to find the Document Root folder quickly. Recall, the instructions on installing the TourSample were given in the section named Installation.
(2) Now load the TourSampleForm form into your web browser through iForm, i.e. not as a file. For example, using the information in the monitor window you can construct the URL of the form as follows. Find the fields named "Name" and "Port" and build the URL as:
https://<name>:<port>/TourSample/TourSampleForm.html
where <name> and <port> are the values of the fields named "Name" and "Port." For example, on my machine now I can enter this URL to access the form over my Airport network:
https://10.0.1.6:12345/TourSample/TourSampleForm.html
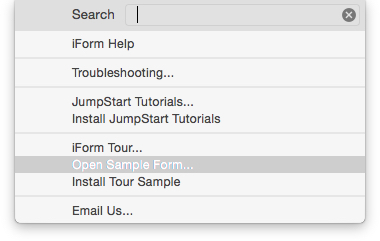
We also built a menu item into iForm to load the TourSampleForm: select "Open Sample Form" in the Help menu:
(3) To run the sample enter a name and email, then click the "Add To Mailings List..." button. The following actions will take place:
A response page saying "thank you" will be returned to you.
An Contacts card will be created in the "Form Submissions" group.
An email confirmation will be emailed to you.
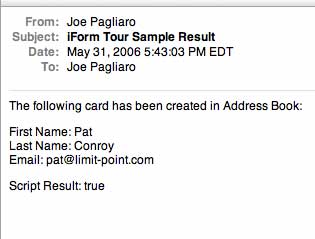
Check your email to find a confirmation email which should look something like this:
Extending The Sample (top sample)
An obvious extension is to provide a mechanism for users to remove themselves from the mailing list automatically.
This will be done using the "Epilogue" and template processing features of Mailings and the ability of iForm to process URL's that contain search arguments.
When Mailings is used to send mail to the Contacts group we created above it can postfix each message with a note explaining how the recipient can remove themselves from the mailing list. The user is instructed to click on an accompanying URL which will be processed by iForm. Using the Mailings template processing mechanism the URL will contain the name and email address of the recipient. When iForm receives the request for the URL it will extract the name and remove the person by the same name from the Contacts group.
Do this as follows:
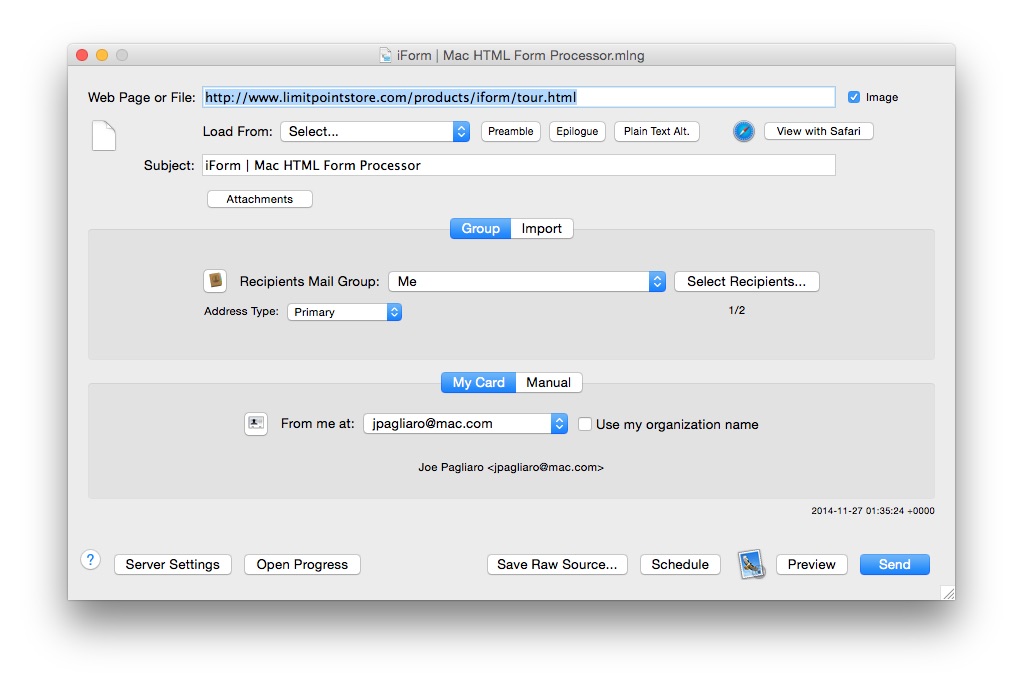
Launch Mailings and open a new Mailer window. Just for fun use this web page as the message body. Assuming you are using a supported browser click the "Current Web Page" button. Your mailer should look something like this:
First add a preamble as a greeting. Select "Preamble" from the "Open Message Editor..." popup menu, and enter a greeting like that shown here (hint: use the "Insert Mail Tag" popup to insert template tags):
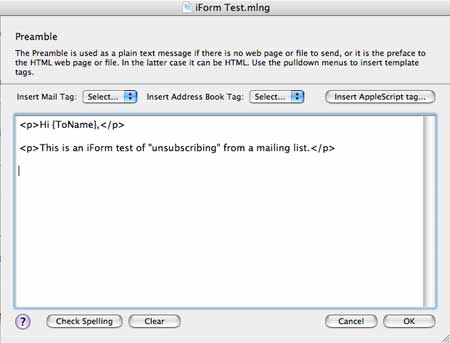
Now create an epilogue in the same way. For the content of the epilogue open the Tour Sample file named "RemoveMeSnippet.html" and copy the section which is commented out, at the top:
This email was sent to: {ToAddress}
We value your privacy. If you would prefer not to
receive our news and special
offers in the future,
<a href="https://10.0.2.2:49529/TourSample/RemoveMe.iform?
firstName={ToNameFirst}&lastName={ToNameLast}&emailAddress={ToAddress}">
you may click here
</a> to unsubscribe.
Your epilogue editor should now look something like this:

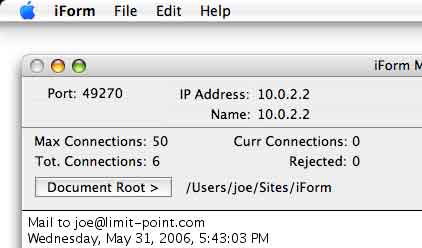
Note that the epilogue contains a URL which points to iForm because the extension of the filename, namely "RemoveMe.iform," is ".iform" - of course the IP address and port in the URL should identify your copy of iForm. You can see the IP address (or domain name) and port iForm is running on by looking in the iForm Monitor window:
Also note that the URL contains template tags which will be expanded to the first and last name of the recipient, creating the proper "search arguments" for the URL so iForm knows which person should be deleted from Contacts.
When iForm receives a request for a file whose extension is "iform" it treats the file as a template. That means that iForm will read the file, process any template tags it contains and then send the expanded file back as the response. Open the "RemoveMe.iform" file to see the template tags in use. In particular note that this template has a template tag which references the AppleScript file "DeletePerson.applescript" which is responsible for deleting the person from Contacts.
Open the script "DeletePerson.applescript" in ScriptEditor to see how it works. Note that it also is a template, and in particular it uses the values from the URL, namely "firstName" and "lastName" to find the proper record in AddressBook to delete.
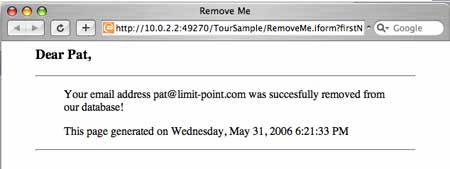
When the user receives the mail message and clicks the "unsubscribe" button iForm will execute the AppleScript referenced by the "RemoveMe.iform" file, replace the tag by the script result and return the page to the user. The user should see a response that looks something like this:
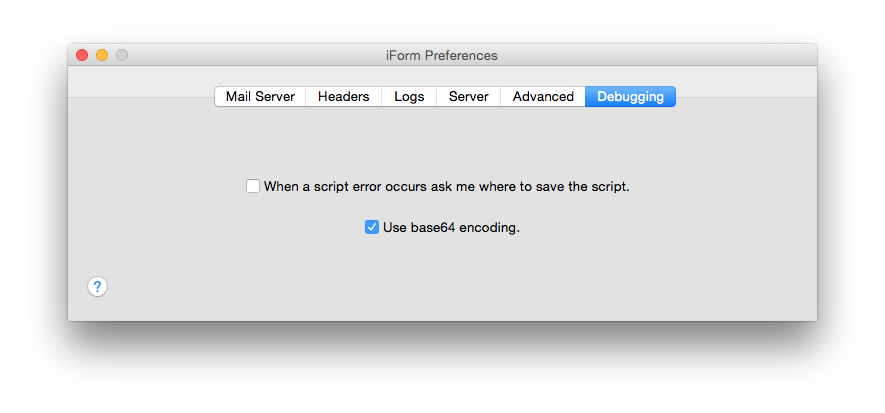
Finally, remember that when you are running your own scripts which contain template tags you can use the Debugging pane of the Preferences window to turn on "script saving" which will output the expanded script file should a script error occur:
To try this extension use the original Tour Sample form to add yourself to the mailing list. Then send the message constructed above using Mailings to the proper Contacts group, and check your email. The link to unsubscribe should be at the bottom. If you click it, and everything goes smoothly, you should be removed from the mailing list in Contacts.
Further Extensions (top sample)
This example can be extended and improved in other ways. For example:
1) Support other Contacts fields such as address, phone and notes.
2) Use the methods explained in the JumpStart tutorial to handle "required items" in case the user leaves a field blank.
3) The sample script above only creates "home" email addresses. Try adding a popup menu item to the form for the user to specify if the email address is a home or work address, and then use that value to create an email address with the proper label, namely "home" or "work."