
Quickly familiarize yourself with Mailings using the Mailings Quick Start, prior to engaging in this tour. The estimated amount of time required to complete this tour is roughly 30 to 50 minutes, and introduces you to some of the more advanced features of Mailings.
Mailings was developed with the objective of combining its features with those of applications that come installed on every Mac: Mail, Address Book, Safari, TextEdit and the AppleScript Editor. This integration will be illustrated in this hands on tour. It illustrates sending out a bulk mailing to announce a birthday party to a group of friends. We are going to start from scratch and use Mailings to send out a simple email that will have formatted text and an image. Each message will contain:
The email announcement will be delivered to a group of recipients in Address Book derived from a text import file, to illustrate each method of addressing.
Note: An alternative method of sending messages with formatted text and images, that you may prefer, is to use Mail Stationery. For instructions on how to do that see "Using Mail Stationery." The example here uses a method called "HTML with embedded images," and is a more "manual" approach.
You will not generally need to repeat these steps for every mailing. Mailings remembers many default settings and you can save specific settings, such as the mail server, into a Mailing's document for re-use.
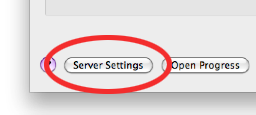
This is, of course, an essential first step in sending out a mailing. Ordinarily it only needs to be done once, until you change to a new mail server. Launch Mailings and when a Mailer window displays click the "Server Settings" button in the lower left corner of the window:
You will need to enter the mail server, the port on which to connect, the authentication information including your mail account username and password, and whether or not to use SSL. These values can usually be copied from your mail client, but Mailings has features to facilitate server setup described below.
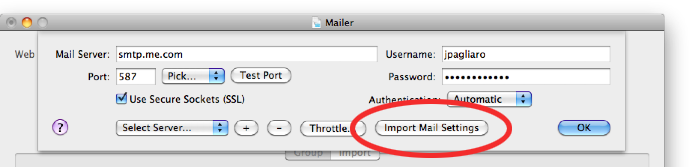
If you use Mail as your mail client to send mail you can import the mail servers and usernames for your accounts into Mailings by clicking the "Import Mail Settings" button:
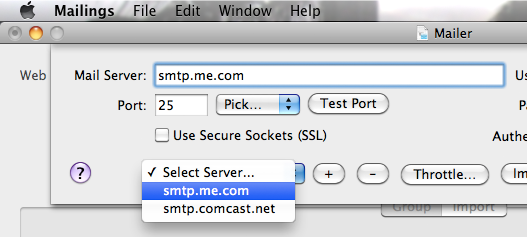
After the Mail settings are loaded, you can pick one from the "Select Server" popup to load its settings into the window:
To pick the proper port you can use the "Pick" popup menu to select from common ports. To verify the port you chose can be used, click the "Test Port" button and wait for a response.
If your mail server can not be contacted on the selected port you will receive a message such as:
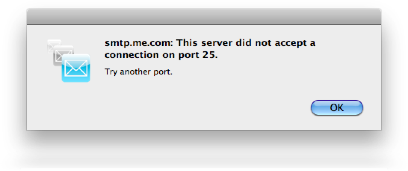
You may receive this message either because your mail server does not listen on that port, or maybe your internet connection is down. In this case my internet connection was down because I turned Airport off to force this alert. Once re-established I received this response:
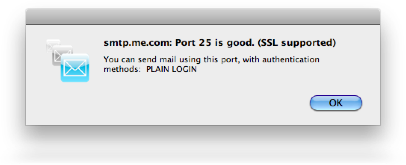
If you use the "Test Port" button it may also advise you which authentication methods are available, as well as whether or not the mail server supports SSL, as shown above.
Some mail servers provide SSL (secure) messaging. Select this option with the "Use Secure Sockets" checkbox under the port text field.
Select the "Automatic" authentication method if you are not sure what to select. "PLAIN" and "LOGIN" methods are commonly supported methods.
Very Important: Finally you can click the "Throttle" button to control the rate your mail is sent. The throttle button opens the throttle pane in the Preferences window.
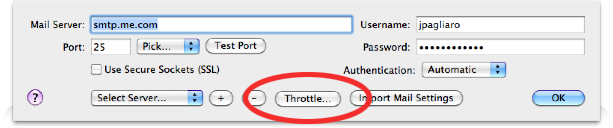
Many mail servers limit the amount of mail you can send in a given period of time. This is very important with bulk email because you can easily reach these limits. You should contact the administrator of your mail server and find out what limits may apply to your account. Then you can use the throttle feature to adjust the rate mail is sent appropriately. (Note that the throttle is not yet mail server specific.)
Once your mail settings have been entered you can save them by clicking the "+' button at the bottom of the Server Settings window.
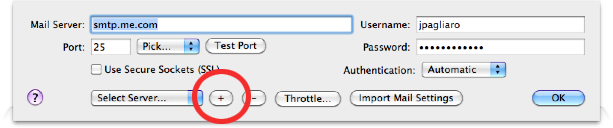
This mail server will then appear in the "Select Server" popup menu. Whenever you select this mail server from the popup menu its settings will be loaded into the window. In this way you can configure several mail servers, save the settings for each, and then access these settings conveniently for future mailings without the need to re-enter them.
Also note that if you save the Mailer window as a Mailings document the current mail settings are also saved. Furthermore, the current mail settings are always used as the default settings of a new, empty Mailer window.
Click the "OK" button to dismiss the Server Settings window.
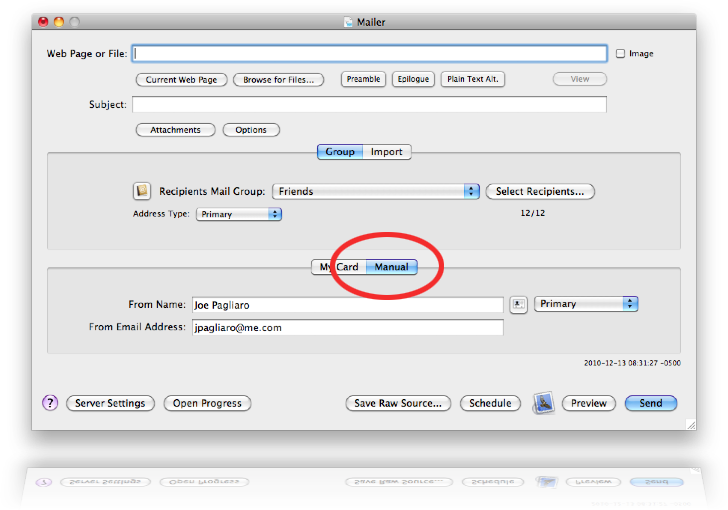
Now you can test that the settings you entered will work. In the Mailer window click the "Manual" tab and enter your name and email address to preview the mail message. For best results this email address should match the SMTP mail account you are using to send mail, i.e. the mail account you are testing:
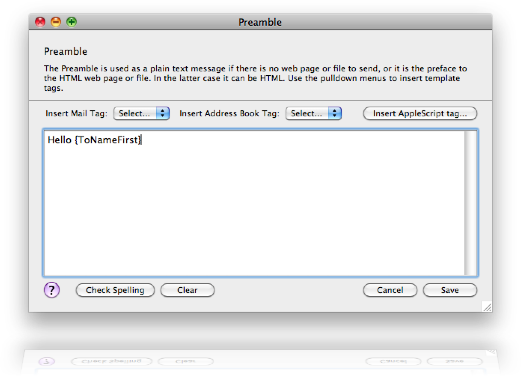
Now click the Preamble button under the "Web Page or File" text field at the top of the Mailer window. In the Preamble window type the following: "Hello {ToNameFirst}"
{ToNameFirst} is a template tag. (See Templates for more information on template tags.) For each message sent this tag is replaced by the first name of the current recipient.
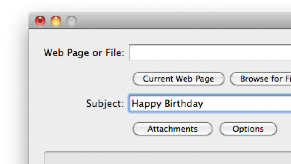
Click the "Save" button and enter a subject. Enter "Happy Birthday".
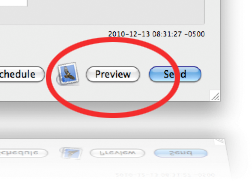
In the Mailer window click the "Preview" button to send the message to yourself, using the server selected in Server Settings.
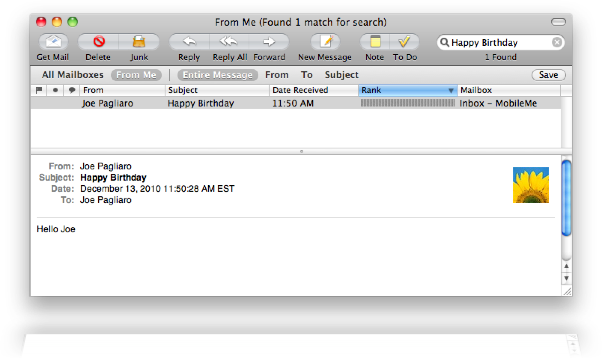
After the message is sent check your mail account for the message. If you received it okay you have properly setup your mail server:
This example is going to use TextEdit to create a simple HTML message with an embedded image. To create the HTML message we are going to use TextEdit, along with Mail and AppleScript Editor.
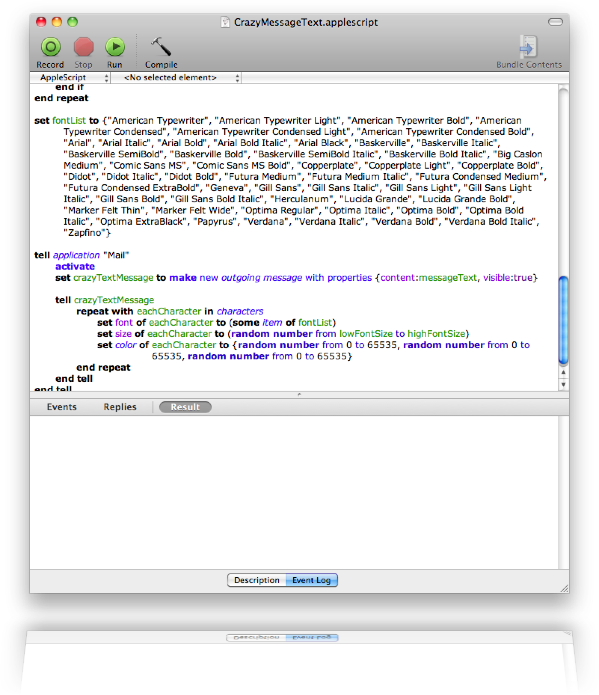
The reason we are using Mail and AppleScript Editor is that there is a sample Mail script we can use to create the text in fun "crazy letters." This script is on your system. It used to be located in the AppleScript folder in your Applications folder, but on Snow Leopard it is located here:
/Library/Scripts/Mails Scripts/Crazy Message Text.scpt
If you can't find this script on your system you can download it from here, and then open it into AppleScript Editor to run it. Try it, it's fun!
Once the script is in AppleScript Editor, click the "Run" button in the toolbar to run the script:
You will be presented with a dialog box for entering the text to format as "crazy" :
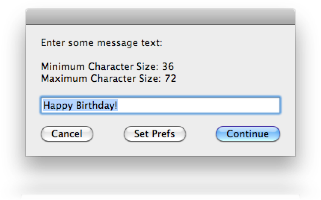
Enter the text "Happy Birthday!" and click "continue. Then a new message in Mail should display, similar to this:
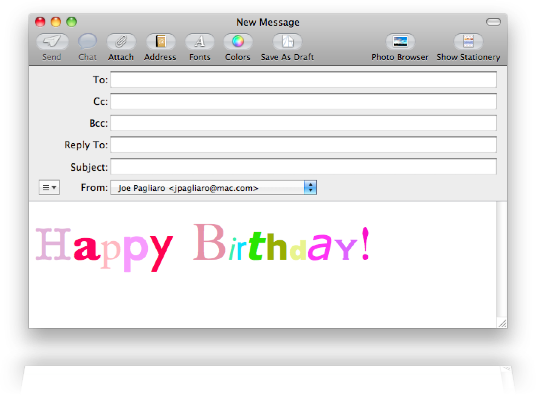
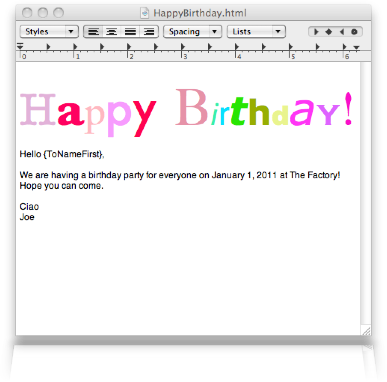
Select all the text in the Mail message, and then copy it to the clipboard. Open TextEdit. At the top of the new document enter:
Hello {ToNameFirst},
We are having a birthday party for everyone on January 1, 2013 at The Factory! Hope you can come.
Ciao
Joe
and paste the crazy text at the top, as shown below. Then save the document as "HappyBirthday!.html" (no spaces) using the format "Web Page (.html)":
We would like to include an image in the message. Drag the following image to your desktop, and make sure it is named "Happy-Birthday.jpg" :

We want this image to be loaded at the top of the message. So we need to edit the "source" or HTML of the file "HappyBirthday!.html" we created in the previous task.
To do this open the file in Safari, or any other browser that can display the source of an HTML page. You can load my copy of the file by clicking it here: HappyBirthday!.html
To see the source in Safari select "View Source" from its "View" menu. The source has a "body" section that looks like this:
<body>
 <p class="p1"><br></p>
 <p class="p2"><span class="s1">H</span><span class="s2"><b>a</b></span><span class="s3">p</span><span class="s4">p</span><span class="s5">y</span><span class="s6"><b> </b></span><span class="s7">B</span><span class="s8"><i>i</i></span><span class="s9">r</span><span class="s10"><b><i>t</i></b></span><span class="s11"><b>h</b></span><span class="s12">d</span><span class="s13"><i>a</i></span><span class="s14">y</span>!</p>
 <p class="p1"><br></p>
 <p class="p3">Hello {ToNameFirst},</p>
 <p class="p1"><br></p>
 <p class="p3">We are having a birthday party for everyone on January 1, 2013 at The Factory! Hope you can come.</p>
 <p class="p1"><br></p>
 <p class="p3">Ciao</p>
 <p class="p3">Joe</p>
 </body>
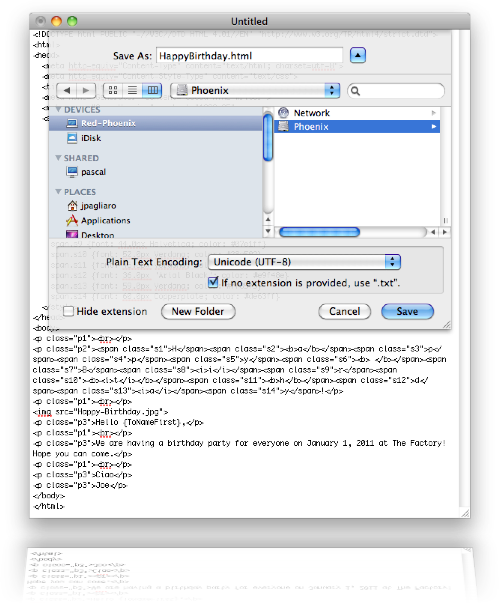
It is the body of the email which the user sees. Just before the part "Hello {ToNameFirst}," we want to see the balloon image. So, copy the source text from Safari into a "plain text" TextEdit document. To do this go to TextEdit and make a new document, then select "Make Plain Text" from the Format menu. Then paste the HTML source into this new document. Just before the line
<p class="p3">Hello {ToNameFirst},</p>
Insert this HTML
<img src="Happy-Birthday.jpg">
This line specifies where the image is located, namely in the same folder as the document, and named "Happy-Birthday.jpg". The "body" section should now look like this:
<body>
    <p class="p1"><br></p>
    <p class="p2"><span class="s1">H</span><span class="s2"><b>a</b></span><span class="s3">p</span><span class="s4">p</span><span class="s5">y</span><span class="s6"><b> </b></span><span class="s7">B</span><span class="s8"><i>i</i></span><span class="s9">r</span><span class="s10"><b><i>t</i></b></span><span class="s11"><b>h</b></span><span class="s12">d</span><span class="s13"><i>a</i></span><span class="s14">y</span>!</p>
    <p class="p1"><br></p>
    <img src="Happy-Birthday.jpg">
    <p class="p3">Hello {ToNameFirst},</p>
    <p class="p1"><br></p>
    <p class="p3">We are having a birthday party for everyone on January 1, 2013 at The Factory! Hope you can come.</p>
    <p class="p1"><br></p>
    <p class="p3">Ciao</p>
    <p class="p3">Joe</p>
  </body>
Now save the file as "HappyBirthday.html" on your desktop. It must be saved right next to the balloon image you saved to your desktop earlier. Do not save the file with a "txt" extension, but rather an "html" extension:
Now open the file you just saved in Safari to make sure the img source link you added is working. In Safari it should look like this:
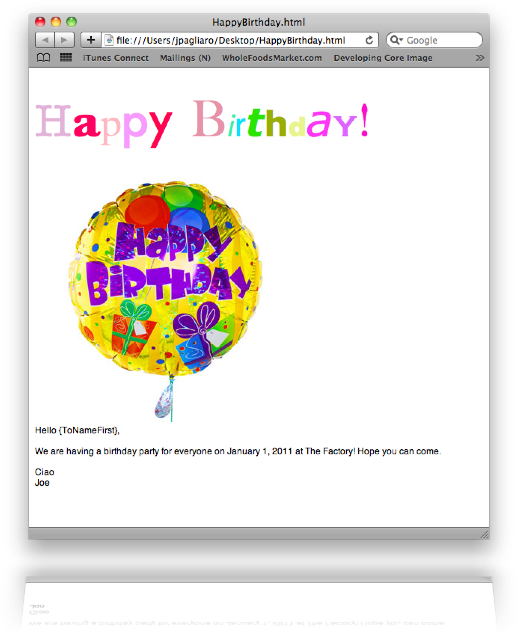
If the balloon image is not showing then make sure it is located in the same folder as "HappyBirthday.html".
The HTML content message is done!
Now simply drag the file "HappyBirthday.html" on your desktop from the Finder into the "Web Page or File" text field.
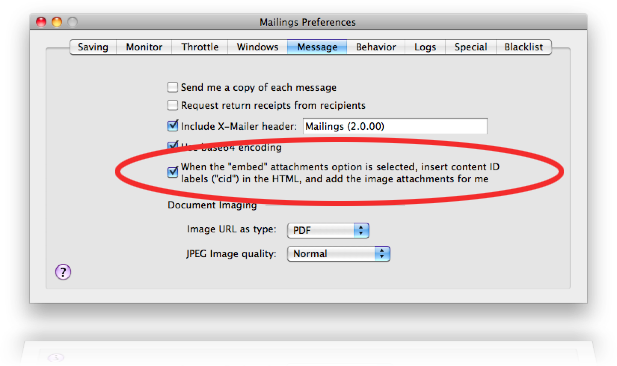
The type of message we are sending is HTML with embedded images. This means that the images do not need to reside on a server, and the image is self contained and viewable even without a network connection. In order to create this type of message the images in the message must be attached to the message, and the image source links in the HTML must contain "Content ID" tags which associate the link with the attached file. This is known as "HTML with embedded images." You can read more about this type of message in Attachments.
Mailings can do this all for you, provided you:
1) Turn this feature on in preferences (it is on by default.) Open the Preferences window, select the Message tab, and check the option shown:
2) Specify the attachment type as "embed" - this is important because this is how Mailings knows you want to create an HTML file with embedded images. Open the Attachments drawer by clicking the "Attachments" button under the "Subject" text field in the Mailer:
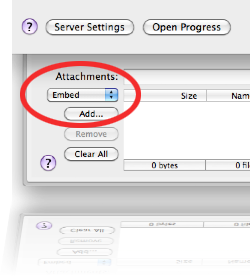
3) Make sure the images are in the same folder as the HTML file and that the image source links references the images by their names (duplicate image names should be avoided.). This is essentially what we did in the previous task "Link the message to an image"
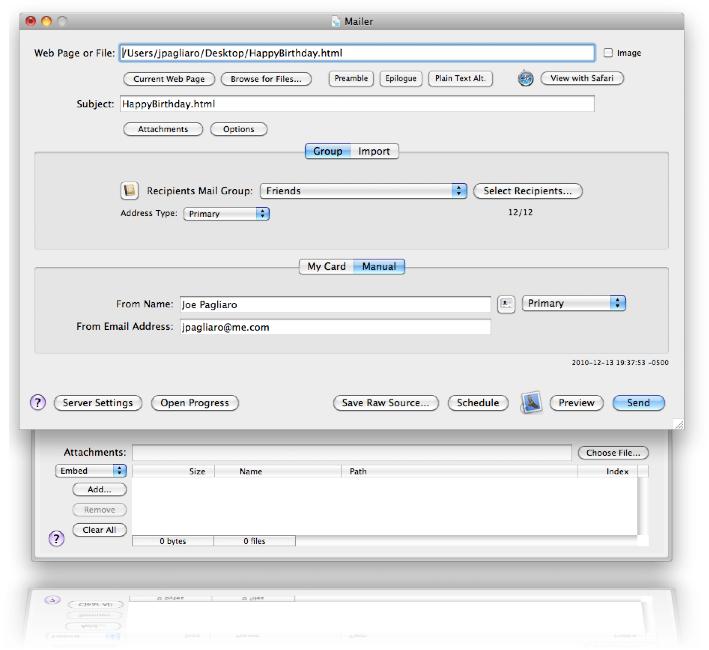
When Mailings sends the message it will automatically insert the cid's labels in the HTML image links and attach the images by adding them to the Attachments window. The mailer window should now look like this:
Importing recipients from CSV or TSV text files is explained in detail in Importing Recipients. The following text file will be used for this example, but you should create your own file with names and email addresses that make sense for you. Ideally the import file for this example will include emails addresses you can readily access to test.
The form of the import file is "First-Last-Email", using "tabs" as the separators:
Bonaventura	Cavalieri	bonaventura@limitpointstore.com
Simeon	Poisson	simeon@limitpointstore.com
Leonhard	Euler	leonhard@limitpointstore.com
Christian	Huygens	christian@limitpointstore.com
Daniel	Bernoulli	daniel@limitpointstore.com
Galileo	Galilei	galileo@limitpointstore.com
Joseph	Fourier	joseph@limitpointstore.com
Henri	Poincare	henri@limitpointstore.com
Adrian	Legendre	adrian@limitpointstore.com
Karl	Weierstrass	karl@limitpointstore.com
Augustin	Cauchy	augustin@limitpointstore.com
Pierre	Descartes	pierre@limitpointstore.com
(This sample file is located here.)
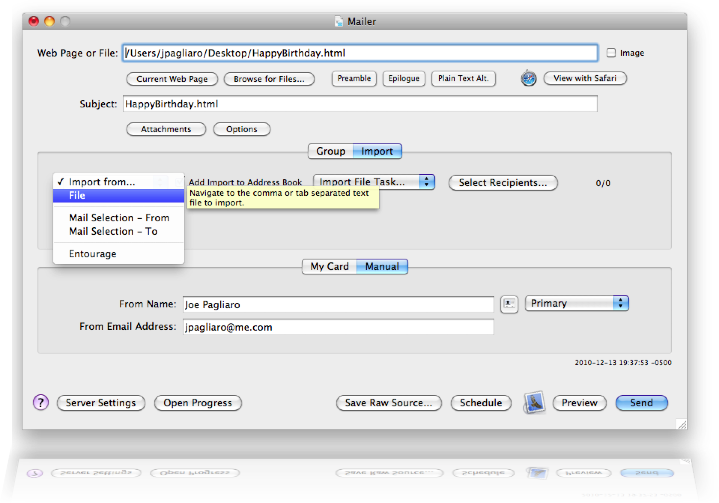
Now we load the import file, selecting the option to add the imported recipients to an Address Book group. This is not necessary, but it is a useful feature in Mailings.
Select the "Import" tab of the Mailer window, then select "file" from the "Import from" popup menu:
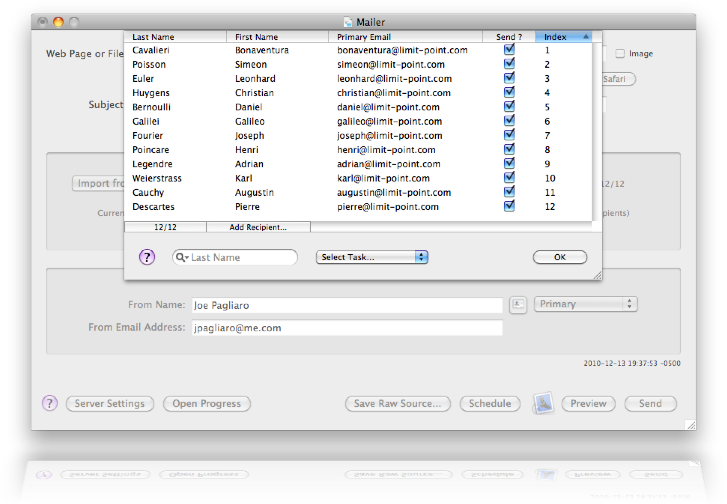
When the navigation dialog window displays, find and select your text import file, which in the case is "FriendsImport.txt." After the file is processed the "Select Recipients" window will display, loaded with all your recipients in the import file:
(You can also just drag the import file into the "Select Recipients" window's list to load it.)
Consult Select Recipients for more information on this window, especially for an explanation of the "Select Task" popup menu, and the usage of the "Send?" column of checkboxes.
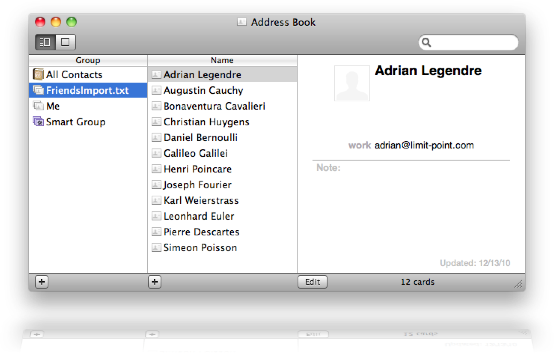
Since I selected the option "Add import to Address Book" a new group named after the import file "FriendsImport.txt" was created in Address Book containing one card for each of the imported recipients:
I am going to use this Address Book group to specify the recipients, rather than the import file:
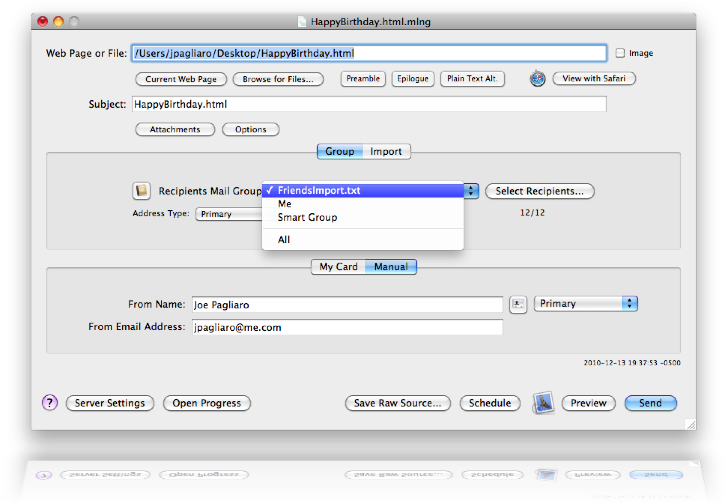
Notice that I specified who the mail is from in the "Manual" tab of the Mailer window.
The message is all set for previewing it. Previewing enables you to verify the mail server settings and view it in a real mail client to make sure it renders well.
There are two ways you can preview the message. The first method uses the "Save Raw Source" button in the Mailer window. When you select this method the raw source of the message which would ordinarily go to the mail server is saved to disk. You can then open that file in a mail program which is capable of displaying raw source (or "eml") files, such as Mail.
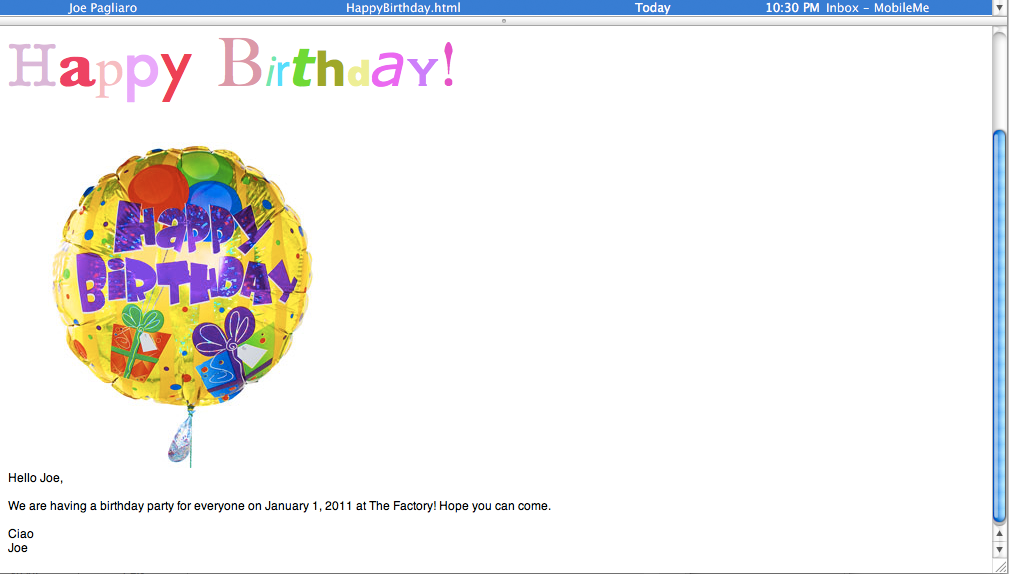
The alternative method uses the Preview button. Simply click the "Preview" button and the message will be sent to the "from" address. The default mail client will automatically open so that you can verify that the message was received and also check if it is rendered okay.
This is how the message was displayed in Mail when received using the Preview button.
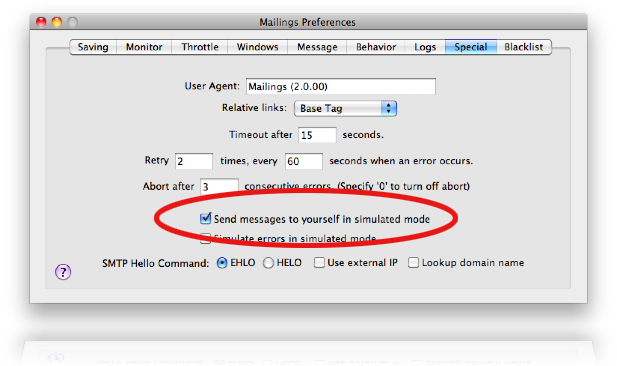
You can send the message with the option to have each simulated message go to yourself, rather than to the actual recipient. This way you can preview what your recipients will receive when you really send.
To do this first open the Preferences window to the "Special" pane, and then select the option "Send messages to yourself in simulated mode" as shown:
Close the Preferences window and select "Simulate Send" from the Mailings menu:
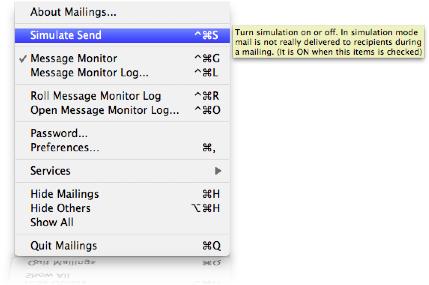
Now click the "Send" button to send the mailing. The progress window displays a special icon in the progress window to indicate that messages are not really being sent to the recipients.
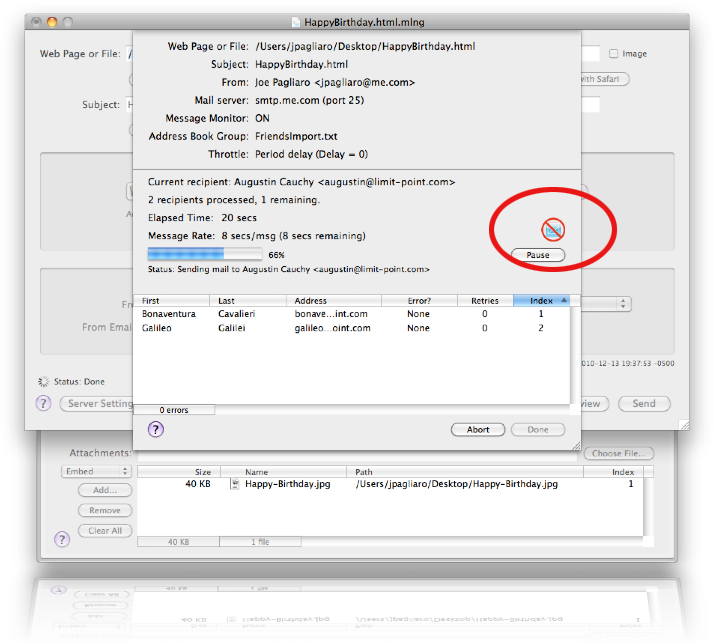
If the Message Monitor was turned on, you can track the delivery of messages. When the recipient opens the email a log entry will be entered into the Message Monitor Log:
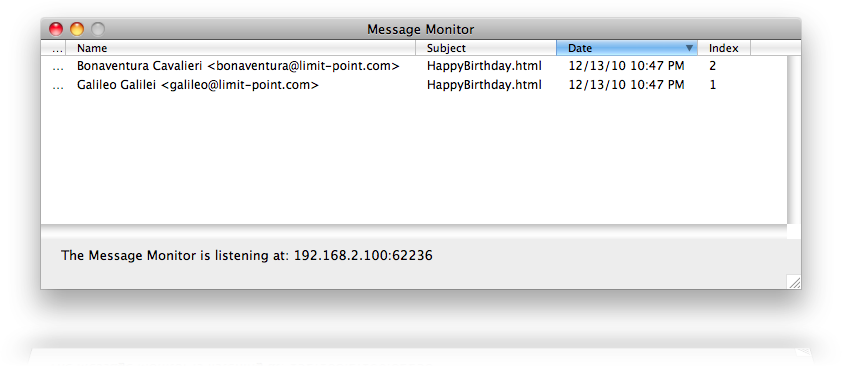
Read Using Message Monitor for more information on setting up the Message Monitor, especially how to choose a preferred port on which to run so that the monitor can continue tracking data if Mailings needed to be restarted.
